Python语言编程学习资料

Python语言编程学习资料(电子书+视频教程)下载汇总:

开发工具:

Python语言集成开发环境 Wingware WingIDE Professional v3.2.12

Python语言集成开发环境 Wingware WingIDE Professional v3.2.9.1

高效Python/Django开发工具:JetBrains PyCharm v1.1.1 (附注册机)

Python和Django开发工具:JetBrains PyCharm v1.1

学习资料:

Python 3程序开发指南 (第二版) 中文PDF下载 Programming in Python 3, 2rd Edition

Python参考手册 (第4版) 中文高清PDF下载 (Python Essential Reference, 4th Edition)

Python技术手册 (第2版) 中文PDF | O’Reilly Python in a Nutshell, 2nd Edition

O’Reilly Programming Python, 4th Edition (涵盖Python 3.x)

Python基础教程 (第2版) 中文高清PDF版

Python学习手册 第3版(Learning Python, 3rd Edition) 中文版PDF

Python Cookbook(第2版)中文版

Python核心编程 (第二版) 高清PDF中文版

Python核心编程 第二版 (Core Python Programming)

LinuxCBT Python Edition – Python编程视频教程

Python UNIX和Linux 系统管理指南

Python 3 Object Oriented Programming

Programming in Python 3: A Complete Introduction to the Python Language

Dive Into Python 3 (附随书源码)

Python 3 for Absolute Beginners

O’Reilly Python Pocket Reference 第四版

Python高级编程 (Expert Python)

Python精要参考(第二版)

Python核心参考 第三版

Making Use of Python

Python 2.6 Text Processing: Beginners Guide

Python入门指南 中文PDF for py 2.5b

A Byte of Python (for Python 3.0)

wxPython实战 (中文版)

Manning wxPython in Action

征服Python-语言基础与典型应用 教程+随书光盘下载

深入Python 中文版

Dive Into Python 5.5 (附代码)

O’Reilly Learning Python 第四版(涵盖Python 2.6和3.x)

O’Reilly Learning Python 第三版

Python How To Program

Wrox Beginning Python

Python Visual Quickstart Guide

Python Developer’s Handbook

O’Reilly Programming Python 第三版

Python 2.1 Bible (Python 2.1 宝典)

O’Reilly Python Standard Library

Python Essential Reference 第四版

Python Essential Reference 第三版

Beginning Python: From Novice to Professional 第二版

Wrox Python: Create – Modify – Reuse

Python UNIX和Linux 系统管理指南 中文PDF下载 | 英文版

Python Programming with the Java Class Libraries

Advanced Python Programming

Python Performance Tips

Python Programming On Win32

Scientific Computing in Python

Python Network Programming

Processing WDSL in Python

O’Reilly Python & XML

mod_python 手册

Thinking in Python

Python Programming for the Absolute Beginner

Game Programming with Python Lua And Ruby

How to Think Like a Computer Scientist – Learning with Python

Text Processing in Python

GUI Programming with Python, Using the Qt Toolkit

Rapid GUI Programming with Python and Qt

Expert Python Programming

Django JavaScript Integration: AJAX and jQuery

Django 1.0 Template Development

Wrox Professional Python Frameworks

The Definitive Guide to django

Beginning Django E-Commerce

Python Frameworks Web 2.0 Programming with Django and TurboGears

Foundations of Agile Python Development

Foundations of Python Network Programming

The Definitive Guide to Pylons

Addison Wesley – Perl to Python Migration

Python Scripting for Computational Science

Mobile Python: Rapid prototyping of applications on the mobile platform

How to Think Like a Computer Scientist: Learning with Python

Numerical Methods in Engineering with Python


python alarm

import time
import sys

soundFile = ‘sound.wav’
not_executed = 1

def soundStart():
if sys.platform[:5] == ‘linux’:
import os
os.popen2(‘aplay -q’ + soundFile)
else:
import winsound
winsound.PlaySound(soundFile, winsound.SND_FILENAME)

while(not_executed):
dt = list(time.localtime())
hour = dt[3]
minute = dt[4]
if hour == 17 and minute == 38: # 下午5点33分的时候开始提示
soundStart()
not_executed = 0
winsound 模块提供访问由 Windows 平台提供的基本的声音播放设备。它包含函数和数个常量。

Beep(frequency, duration)
蜂鸣PC的喇叭。 frequency 参数指定声音的频率,以赫兹,并且必须是在 37 到 32,767
的范围之中。duration 参数指定声音应该持续的毫秒数。如果系统不能蜂鸣喇叭,挂起 RuntimeError。注意:Windows 95 和 98下,Windows Beep() 函数存在但是无效的(它忽略它的参数)。这种情况下Python通过直接的端口操作模拟它(2.1版本中增加的)。不知道是否在所有的系统上都工作。 1.6版本中的新特性。

PlaySound(sound, flags)
从平台 API 中调用 PlaySound() 函数。sound 参数必须是一个文件名,音频数据作为字符串,或为 None。它的解释依赖于 flags 的值,该值可以是一个位方式或下面描述的变量的组合。如果系统显示一个错误,挂起 RuntimeError 。

MessageBeep([type=MB_OK])
从平台 API 中调用 MessageBeep() 函数。播放一个在注册表中指定的声音。type 参数指定播放哪一个声音;可能的值是 -1,MB_ICONASTERISK,MB_ICONEXCLAMATION,MB_ICONHAND,MB_ICONQUESTION,和 MB_OK,所有的描述如下。值 -1 产生一个“简单的蜂鸣”;换句话说这是如果声音不能被播放的后备计划。2.3版本中的新特性。

SND_FILENAME
sound 参数是一个 WAV 文件的名称。不使用 SND_ALIAS。

SND_ALIAS
sound 参数是注册表中一个声音组合的名称。如果注册表没有包含这样的名称,播放系统缺省的声音除非 SND_NODEFAULT 也被指定。如果没有缺省的声音被注册,挂起 RuntimeError。不使用 SND_FILENAME。
所有的 Win32 系统至少支持下列,大多数系统支持的更多:
PlaySound() 名称 对应的控制面板声音名称
‘SystemAsterisk’ Asterisk
‘SystemExclamation’ Exclamation
‘SystemExit’ Exit Windows
‘SystemHand’ Critical Stop
‘SystemQuestion’ Question
例子:

import winsound

# Play Windows exit sound.
winsound.PlaySound(“SystemExit”, winsound.SND_ALIAS)

# Probably play Windows default sound, if any is registered (because
# “*” probably isn’t the registered name of any sound).
winsound.PlaySound(“*”, winsound.SND_ALIAS)

SND_LOOP
重复地播放声音。SND_ASYNC标识也必须被用来避免堵塞。不能用 SND_MEMORY。

SND_MEMORY
提供给PlaySound()的 sound 参数是一个 WAV 文件的内存映像(memory image),作为一个字符串。
注意:这个模块不支持从内存映像中异步播放,因此这个标识和 SND_ASYNC 的组合将挂起 RuntimeError。

SND_PURGE
停止播放所有指定声音的实例。

SND_ASYNC
立即返回,允许声音异步播放。

SND_NODEFAULT
不过指定的声音没有找到,不播放系统缺省的声音。

SND_NOSTOP
不中断当前播放的声音。

SND_NOWAIT
如果声音驱动忙立即返回。

MB_ICONASTERISK
播放 SystemDefault 声音。

MB_ICONEXCLAMATION
播放 SystemExclamation 声音。

MB_ICONHAND
播放 SystemHand 声音。

MB_ICONQUESTION
播放 SystemQuestion 声音。

MB_OK
播放 SystemDefault 声音。

实例一


import wx
from wx.lib.filebrowsebutton import FileBrowseButton

class MyFrame(wx.Frame):
def __init__(self):
wx.Frame.__init__(self, None, title=”wx.Sound”,size=(500,100))
p = wx.Panel(self)

self.fbb = FileBrowseButton(p,labelText=”Select WAV file:”,fileMask=”*.wav”)
btn = wx.Button(p, -1, “Play”)
self.Bind(wx.EVT_BUTTON, self.OnPlaySound, btn)

sizer = wx.BoxSizer(wx.HORIZONTAL)
sizer.Add(self.fbb, 1, wx.ALIGN_CENTER_VERTICAL)
sizer.Add(btn, 0, wx.ALIGN_CENTER_VERTICAL)
border = wx.BoxSizer(wx.VERTICAL)
border.Add(sizer, 0, wx.EXPAND|wx.ALL, 15)
p.SetSizer(border)

def OnPlaySound(self, evt):
filename = self.fbb.GetValue()
self.sound = wx.Sound(filename)
if self.sound.IsOk():
self.sound.Play(wx.SOUND_ASYNC)
else:
wx.MessageBox(“Invalid sound file”, “Error”)

app = wx.PySimpleApp()
frm = MyFrame()
frm.Show()
app.MainLoop()

实例二

import wx
import wx.media
import os

class Panel1(wx.Panel):
def __init__(self, parent, id):
#self.log = log
wx.Panel.__init__(self, parent, -1, style=wx.TAB_TRAVERSAL|wx.CLIP_CHILDREN)

# Create some controls
try:
self.mc = wx.media.MediaCtrl(self, style=wx.SIMPLE_BORDER)
except NotImplementedError:
self.Destroy()
raise

loadButton = wx.Button(self, -1, “Load File”)
self.Bind(wx.EVT_BUTTON, self.onLoadFile, loadButton)

playButton = wx.Button(self, -1, “Play”)
self.Bind(wx.EVT_BUTTON, self.onPlay, playButton)

pauseButton = wx.Button(self, -1, “Pause”)
self.Bind(wx.EVT_BUTTON, self.onPause, pauseButton)

stopButton = wx.Button(self, -1, “Stop”)
self.Bind(wx.EVT_BUTTON, self.onStop, stopButton)

slider = wx.Slider(self, -1, 0, 0, 0, size=wx.Size(300, -1))
self.slider = slider
self.Bind(wx.EVT_SLIDER, self.onSeek, slider)

self.st_file = wx.StaticText(self, -1, “.mid .mp3 .wav .au .avi .mpg”, size=(200,-1))
self.st_size = wx.StaticText(self, -1, size=(100,-1))
self.st_len = wx.StaticText(self, -1, size=(100,-1))
self.st_pos = wx.StaticText(self, -1, size=(100,-1))

# setup the button/label layout using a sizer
sizer = wx.GridBagSizer(5,5)
sizer.Add(loadButton, (1,1))
sizer.Add(playButton, (2,1))
sizer.Add(pauseButton, (3,1))
sizer.Add(stopButton, (4,1))
sizer.Add(self.st_file, (1, 2))
sizer.Add(self.st_size, (2, 2))
sizer.Add(self.st_len, (3, 2))
sizer.Add(self.st_pos, (4, 2))
sizer.Add(self.mc, (5,1), span=(5,1)) # for .avi .mpg video files
self.SetSizer(sizer)

self.timer = wx.Timer(self)
self.Bind(wx.EVT_TIMER, self.onTimer)
self.timer.Start(100)

def onLoadFile(self, evt):
dlg = wx.FileDialog(self, message=”Choose a media file”,
defaultDir=os.getcwd(), defaultFile=””,
style=wx.OPEN | wx.CHANGE_DIR )
if dlg.ShowModal() == wx.ID_OK:
path = dlg.GetPath()
self.doLoadFile(path)
dlg.Destroy()

def doLoadFile(self, path):
if not self.mc.Load(path):
wx.MessageBox(“Unable to load %s: Unsupported format?” % path, “ERROR”, wx.ICON_ERROR | wx.OK)
else:
folder, filename = os.path.split(path)
self.st_file.SetLabel(‘%s’ % filename)
self.mc.SetBestFittingSize()
self.GetSizer().Layout()
self.slider.SetRange(0, self.mc.Length())
self.mc.Play()

def onPlay(self, evt):
self.mc.Play()

def onPause(self, evt):
self.mc.Pause()

def onStop(self, evt):
self.mc.Stop()

def onSeek(self, evt):
offset = self.slider.GetValue()
self.mc.Seek(offset)

def onTimer(self, evt):
offset = self.mc.Tell()
self.slider.SetValue(offset)
self.st_size.SetLabel(‘size: %s ms’ % self.mc.Length())
self.st_len.SetLabel(‘( %d seconds )’ % (self.mc.Length()/1000))
self.st_pos.SetLabel(‘position: %d ms’ % offset)

app = wx.PySimpleApp()
# create a window/frame, no parent, -1 is default ID
frame = wx.Frame(None, -1, “play audio and video files”, size = (320, 350))
# call the derived class
Panel1(frame, -1)
frame.Show(1)
app.MainLoop()

初学Python,版本如何选择?

早在四年多以前,在我进入英才网之前,去面试过一家海归创业的公司。他们需要的是有unix开发经验的技术人员,但是因为他们当时所处的阶段对很多成熟 技术人员不是很吸引,所以条件放宽为熟悉面向对象的程序开发即可考虑。我当时草草看过过一遍C#的语法,当时的水平对一门新语言的掌握速度远不如现在,因 此也仅学到点皮毛,对于很多概念都不了解,比如重载和重写就不知道。我第一次听说Python这个语言,就是在那次面试。

当时面试官在了解了我的情况之后,问我都掌握一些什么语言。我说我会什么什么(在这里不好意思列举),并且说刚刚学习了点C#。他说,那你对 Python了解吗?我当时就茫然了,然后傻了吧唧的说,我对这些新技术了解的不多。结果搞得那人也有点不知怎么说才好,憋了半天,才说,这个技术其实也 不是很新,只是在国内不怎么流行。后来我才知道,这个技术确实已经可以算是比较老了。令我没想到的是,时过4年,这个技术在中国也变得如此流行了。

言归正传。打算学Python,还得从开放平台说起。自从闭关以来,狂上网了解这几年的技术趋势,发现最近很流行开放平台。除了社交类网站的开 放平台,google、百度等也推出了自己的开放平台。百度的风格很中国,总也搞不起来那种实验室、学院派的气氛来,反观Google就显得更有声有色一 些。了解了Google 的App Engine,看到它指定的开发语言就是Python(java作为第二语言也被支持了),于是就打算先学学这门语言。

买了本Python的中文教材,下载了一些视频。然后上到官方网站Python.org,习惯性的下载了最新版的Python解释器,然后就开 始尝试。但是郁闷的是,按照教程编写的第一个程序就不成功。看来看去,发现原来Python3和Python2是完全两个不同的东西。我按照 Python2.7的教程编写的程序,在Python3下根本就不能正常运行。于是,又到Python的官网上仔细看了一遍,发现这样一个页面:http://wiki.python.org/moin/Python2orPython3 。这篇文章的题目就是:究竟是选择Python2还是Python3?

这篇文章开篇第一句话,让我心里拔凉拔凉的:Python 2.x is the status quo, Python 3.x is the shiny new thing。嘛意思?意思就是,Python2.x到此为止,你可以继续用,但是我们不会再对这个框架进行升级。Python3.x将是一个全新的东西。 说白了,就是我们准备抛弃Python2.x了,就像MicroSoft当年抛弃ASP一样,这个语言的下一个版本会被完全重新设计。问题纠结 于,Python2.x经过那么长时间的发展,已经积累了大量的财富,有大量可以直接采用的解决方案,而Python3.x的应用还是空白。那么,作为一 个初学者,应该学哪个版本呢?

说实话,我也没办法给你确切的答案。而官方给出的建议是:Which version you ought to use is mostly dependent on what you want to get done。说的多好啊,比中国人还深谙太极之道。看来不只影视明星擅长打太极,技术明星也一样。不过,官方还是给出了一些具体的建议的。 Python2.x好在哪?首先,它有大量的现成函数库可用;其次,现行的Mac和Linux默认的解释器还是Python2.x的。而有些情况下,你还 没得选择,必须用2.x,比如当你的程序的运行环境不取决于你的时候,Google 的App Engine就是用的2.5版本。但是,人家官方也说了,虽然2.x是宝刀未老,但是3.x作为一门语言来说也是definitely ready的,所以到底怎么选还是要看你。

我的建议是,如果你有确切的项目要做,或者你学习这个东西希望在半年之内有所成并且希望仗此谋得一份工作,我建议你学2.x。比如我就是想尝试 尝试Google的开放平台,那么我会选择2.x。如果你只是对这门语言感兴趣,想学学,而又没有具体的时间表说哪天哪天我必须要用它来做什么,那么我建 议你学3.x,这样你能完整的跟着这门语言一起成长,等到它的应用环境成熟的时候,你也已经是个可用之才了。并且,对于学习2.x的朋友,我建议你有时间 有精力的话最好也适时开始3.x的学习,3.x才是未来。

py2exe email..

一、简介


py2exe是一个将python脚本转换成windows上的可独立执行的可执行程序(*.exe)的工具,这样,你就可以不用装python而在windows系统上运行这个可执行程序。


py2exe已经被用于创建wxPython,Tkinter,Pmw,PyGTK,pygame,win32com client和server,和其它的独立程序。py2exe是发布在开源许可证下的。


二、安装py2exe


http://prdownloads.sourceforge.net/py2exe 下载并运行与你所安装的Python对应的py2exe版本的installer,这将安装py2exe和相应的例子;这些例子被安装在libsite-packagespy2exesamples目录下。


三、py2exe的用法


如果你有一个名为helloworld.py的python脚本,你想把它转换为运行在windows上的可执行程 序,并运行在没有安装python的 windows系统上,那么首先你应写一个用于发布程序的设置脚本例如mysetup.py,在其中的setup函数前插入语句 import py2exe 。
mysetup.py示例如下:


Python代码
  1. from distutils.core import setup
  2. import py2exe
  3. setup(console=["helloworld.py"])


如果显示错误提示的话 “ msvcp90.dll: no such file or directory”


请尝试下面的方法:


Python代码
  1. from distutils.core import setup
  2. import py2exe
  3. setup(
  4.     console=["helloworld.py"],
  5.     options = { ”py2exe”: { ”dll_excludes”: ["MSVCP90.dll"] } }
  6. )


然后按下面的方法运行mysetup.py: (dos:  cmd => cd desktop => mysetup.py py2exe)
python mysetup.py py2exe
上面的命令执行后将产生一个名为dist的子目录,其中包含了helloworld.exe,python24.dll,library.zip这些文件。
如果你的helloworld.py脚本中用了已编译的C扩展模块,那么这些模块也会被拷贝在个子目录中,同样,所有的dll文件在运行时都是需要的,除了系统的dll文件。
dist子目录中的文件包含了你的程序所必须的东西,你应将这个子目录中的所有内容一起发布。

默认情况下,py2exe在目录dist下创建以下这些必须的文件:
1、一个或多个exe文件。
2、python##.dll。
3、几个.pyd文件,它们是已编译的扩展名,它们是exe文件所需要的;加上其它的.dll文件,这些.dll是.pyd所需要的。
4、一个library.zip文件,它包含了已编译的纯的python模块如.pyc或.pyo
上面的mysetup.py创建了一个控制台的helloword.exe程序,如果你要创建一个图形用户界的程序,那么你只需要将mysetup.py中的console=["helloworld.py"]替换为windows=["myscript.py"]既可。


py2exe一次能够创建多个exe文件,你需要将这些脚本文件的列表传递给console或windows的关键字参数。如果你有几个相关联的脚本,那么这是很有用的。
运行下面个命令,将显示py2exe命令的所有命令行标记。
python mysetup.py py2exe –help


Python代码
  1. Global options:
  2.   –verbose (-v)  run verbosely (default)
  3.   –quiet (-q)    run quietly (turns verbosity off)
  4.   –dry-run (-n)  don’t actually do anything
  5.   –help (-h)     show detailed help message
  6. Options for ’py2exe’ command:
  7.   –optimize (-O)       optimization level: -O1 for ”python -O”, -O2 for
  8.                         ”python -OO”, and -O0 to disable [default: -O0]
  9.   –dist-dir (-d)       directory to put final built distributions in (default
  10.                         is dist)
  11.   –excludes (-e)       comma-separated list of modules to exclude
  12.   –dll-excludes        comma-separated list of DLLs to exclude
  13.   –ignores             comma-separated list of modules to ignore if they are
  14.                         not found
  15.   –includes (-i)       comma-separated list of modules to include
  16.   –packages (-p)       comma-separated list of packages to include
  17.   –compressed (-c)     create a compressed zipfile
  18.   –xref (-x)           create and show a module cross reference
  19.   –bundle-files (-b)   bundle dlls in the zipfile or the exe. Valid levels
  20.                         are 1, 2, or 3 (default)
  21.   –skip-archive        do not place Python bytecode files in an archive, put
  22.                         them directly in the file system
  23.   –ascii (-a)          do not automatically include encodings and codecs
  24.   –custom-boot-script  Python file that will be run when setting up the
  25.                         runtime environment
  26. usage: setup_py2exe.py [global_opts] cmd1 [cmd1_opts] [cmd2 [cmd2_opts] …]
  27.    or: setup_py2exe.py –help [cmd1 cmd2 ...]
  28.    or: setup_py2exe.py –help-commands
  29.    or: setup_py2exe.py cmd –help


四、指定额外的文件


一些应用程序在运行时需要额外的文件,诸如配置文件、字体、位图。
如果在安装脚本中用data_files可选项指定了那些额外的文件,那么py2exe能将这些文件拷贝到dist子目录中。data_files应包含一个元组(target-dir, files)列表,其中的files是这些额外的文件的列表。
示例如下:


PythonCode:  # mysetup.py


Python代码
  1. from distutils.core import setup
  2. import glob
  3. import py2exe
  4. setup(console=["helloworld.py"],
  5.       data_files=[("bitmaps",
  6.                    ["bm/large.gif", "bm/small.gif"]),
  7.                   (“fonts”,
  8.                    glob.glob(“fonts\*.fnt”))],
  9. )


说明:data_files选项将创建一个子目录distbitmaps,其中包含两个.gif文件;一个子目录distfonts,其中包含了所有的.fnt文件。


五、Windows NT services


你可以通过传递一个service关键字参数给setup函数来建造Windows NT services
,这个service参数的值必须是一个Python模块名(包含一service类)的列表。
示例如下:

PythonCode:  # mysetup.py


Python代码
  1. from distutils.core import setup
  2. import py2exe
  3. setup(service=["MyService"])


所建造的可执行的service是可以通过在其后跟一定的命令行参数标记来自行安装和卸载的。你可以通过在这个可执行的service(exe)后跟一-help参数来得到更多的帮助。
六、COM servers


你可以通过传递一个com_server 关键字参数给setup函数来建造Windows NT services
,这个service参数的值必须是一个Python模块名(包含一个或多个COM server 类)的列表。
示例如下:

PythonCode:  # mysetup.py


Python代码
  1. from distutils.core import setup
  2. import py2exe
  3. setup(com_server=["win32com.server.interp"])


默认情况下,DLL和EXE servers被建造,你不需要它们的话你可以简单的删除它们。

一个标准的py2exe setup文件编写


Python代码
  1.  -*- coding: cp936 -*-
  2. from distutils.core import setup
  3. import py2exe
  4. includes = ["encodings", "encodings.*"]
  5. #要包含的其它库文件
  6. options = {“py2exe”:
  7.     {“compressed”: 1, #压缩
  8.      ”optimize”: 2,
  9.      ”ascii”: 1,
  10.      ”includes”:includes,
  11.      ”bundle_files”: 1 #所有文件打包成一个exe文件 }
  12.     }
  13. setup(
  14.     options = options,
  15.     zipfile=None,   #不生成library.zip文件
  16.     console=[{"script": "hello.py", "icon_resources": [(1, "hello.ico")] }]#源文件,程序图标
  17.     )


新 版本已经可以打包为一个文件了,以前都是一堆dll,pyd的。具体的变化其实只有一个地方。就是options里增加bundle_files项,值为 1表示pyd和dll文件会被打包到exe文件中,且不能从文件系统中加载python模块;值为2表示pyd和dll文件会被打包到exe文件中,但是 可以从文件系统中加载python模块。另外setup中使用zipfile=None可以不生成library.zip。


例如原来 的:


Python代码
  1. from distutils.core import setup
  2. import py2exe
  3. includes = ["encodings", "encodings.*"]
  4. options = {“py2exe”:
  5.             {   ”compressed”: 1,
  6.                 ”optimize”: 2,
  7.                 ”includes”: includes,
  8.             }
  9.           }
  10. setup(
  11.     version = ”0.1.0″,
  12.     description = ”search panda”,
  13.     name = ”search panda”,
  14.     options = options,
  15.     windows=[{"script": "search.py", "icon_resources": [(1, "search.ico")] }],
  16.     )


只需要改为:


Python代码
  1. from distutils.core import setup
  2. import py2exe
  3. includes = ["encodings", "encodings.*"]
  4. options = {“py2exe”:
  5.             {   ”compressed”: 1,
  6.                 ”optimize”: 2,
  7.                 ”includes”: includes,
  8.                 ”bundle_files”: 1
  9.             }
  10.           }
  11. setup(
  12.     version = ”0.1.0″,
  13.     description = ”search panda”,
  14.     name = ”search panda”,
  15.     options = options,
  16.     zipfile=None,
  17.     windows=[{"script": "search.py", "icon_resources": [(1, "search.ico")] }],
  18.     )


比如,这里我打包以前的DelphiCode2HTML的


Python代码
  1. # -*- coding: gbk -*-
  2. from distutils.core import setup
  3. import py2exe
  4. includes = ["encodings", "encodings.*"]
  5. options = {“py2exe”:
  6.                     {“compressed”: 1,
  7.                      ”optimize”: 2,
  8.                      ”ascii”: 1,
  9.                      ”includes”:includes,
  10.                      ”bundle_files”: 1}
  11.            }
  12. setup(
  13.     options = options,
  14.     zipfile=None,
  15.     name = ”HelloGuys.”,
  16.     description = ”this is a py2exe test”,
  17.     windows=[{"script": "F:我的程序PythonCSDN Code EditCode2Html.py",
  18.               "icon_resources": [(1, "F:书籍我的图标图标xpConvert.ico")]
  19.               }]
  20.     )


下面列出他的一些 options


keyword   description
data_files   list of “data” files that you are going to need to run your executable such as .pngs, .jpgs


Py2exe extends Distutils setup keywords


In addition to the standard distutils setup keywords, the following py2exe keywords specify what and how to build.

keyword description
console list of scripts to convert into console exes
windows list of scripts to convert into GUI exes
service list of module names containing win32 service classes
com_server list of module names containing com server classes
ctypes_com_server list of module names containing com server classes
zipfile name of shared zipfile to generate; may specify a subdirectory; defaults to ‘library.zip’. If zipfile is set toNone , the files will be bundled within the executable instead of ‘library.zip’.
options dictionary { “py2exe”: { ”opt1″: val1, “opt2″: val2, … } }


The options dictionary of py2exe


The option keyword takes the following set of dictionary key: value pairs. The dictionary “key” names and the “value” types are listed in the table below.


key value
unbuffered if true, use unbuffered binary stdout and stderr
optimize string or int of optimization level (0, 1, or 2) 0 = don’t optimize (generate .pyc) 1 = normal optimization (like python -O) 2 = extra optimization (like python -OO) See http://docs.python.org/distutils/apiref.html#module-distutils.util for more info.
includes list of module names to include
packages list of packages to include with subpackages
ignores list of modules to ignore if they are not found
excludes list of module names to exclude
dll_excludes list of dlls to exclude
dist_dir directory in which to build the final files
typelibs list of gen_py generated typelibs to include
compressed (boolean) create a compressed zipfile
xref (boolean) create and show a module cross reference
bundle_files bundle dlls in the zipfile or the exe. Valid values for bundle_files are: 3 = don’t bundle (default) 2 = bundle everything but the Python interpreter 1 = bundle everything, including the Python interpreter
skip_archive (boolean) do not place Python bytecode files in an archive, put them directly in the file system
ascii (boolean) do not automatically include encodings and codecs
custom-boot-script Python file that will be run when setting up the runtime environment


Example:


Python代码
  1. setup(
  2.         windows=['trypyglet.py'],
  3.         options={
  4.                 ”py2exe”:{
  5.                         ”unbuffered”: True,
  6.                         ”optimize”: 2,
  7.                         ”excludes”: ["email"]
  8.                 }
  9.         }
  10. )


For more information enter the following at the python command line:


Python代码
  1. >>> from distutils.core import setup
  2. >>> help(setup)


注意 windows 的用法,他可以代替 console, 如果你要集成 wxpython 的时候,一定会用的 !


更多请查看 http://www.py2exe.org/index.cgi/ListOfOptions


如果程序中含有email类,并且压缩时出现类似 “ImportError: No module named multipart ” 的错误,你需要如下的设置:


1. 尝试将Lib下的email包,复制到当前文件夹中

2. 把['emai'] 放入includes中

3. 把['email']放入packages中

4. 继续运行py2exe


如:


Python代码
  1. from distutils.core import setup
  2. import py2exe
  3. includes = ["encodings", "encodings.*",'email']
  4. options = {“py2exe”:
  5.             {   ”compressed”: 1,
  6.                 ”optimize”: 2,
  7.                 ”includes”: includes,
  8.                 ”bundle_files”: 1,
  9.                 ”packages”: ['email'],
  10.                 ”dll_excludes”: ["MSVCP90.dll"]
  11.             }
  12.           }
  13. setup(
  14.     version = ”0.1.0″,
  15.     description = ”3th”,
  16.     name = ”For My Lover”,
  17.     options = options,
  18.     zipfile=None,
  19.     windows=[{"script": "love.py", "icon_resources": [(1, "roses.ico")] }],
  20.     )

使用 Python 登录网站

对于大部分论坛,我们想要抓取其中的帖子分析,首先需要登录,否则无法查看。

这是因为 HTTP 协议是一个无状态(Stateless)的协议,服务器如何知道当前请求连接的用户是否已经登录了呢?有两种方式:

  1. 在URI 中显式地使用 Session ID;
  2. 利用 Cookie,大概过程是登录一个网站后会在本地保留一个 Cookie,当继续浏览这个网站的时候,浏览器会把 Cookie 连同地址请求一起发送过去。

Python 提供了相当丰富的模块,所以对于这种网络操作只要几句话就可以完成。我以登录 QZZN 论坛为例,事实上下面的程序几乎所有的 PHPWind 类型的论坛都是适用的。
# -*- coding: GB2312 -*-

from urllib import urlencode
import cookielib, urllib2

# cookie
cj = cookielib.LWPCookieJar()
opener = urllib2.build_opener(urllib2.HTTPCookieProcessor(cj))
urllib2.install_opener(opener)

# Login
user_data = {‘pwuser’: ‘你的用户名’,
‘pwpwd’: ‘你的密码’,
‘step’:’2′

url_data = urlencode(user_data)
login_r = opener.open("http://bbs.qzzn.com/login.php", url_data)

一些注释:

  1. urllib2 显然是比 urllib 高级一点的模块,里面包括了如何使用 Cookies。
  2. 在 urllib2 中,每个客户端可以用一个 opener 来抽象,每个 opener 又可以增加多个 handler 来增强其功能。
  3. 在构造 opener 时指定了 HTTPCookieProcessor 做为 handler,因此这个 handler 支持 Cookie。
  4. 使用 isntall_opener 后,调用 urlopen 时会使用这个 opener。
  5. 如果不需要保存 Cookie,cj 这个参数可以省略。
  6. user_data 存放的就是登录所需要的信息,在登录论坛的时候把这个信息传递过去就行了。
  7. urlencode 功能是把字典 user_data 编码成”?pwuser=username&pwpwd=password”的形式,这样做是为了使程序易读一些。

最后一个问题是,pwuser、pwpwd 这类的名字是从哪儿来的,这就要分析需要登录的网页了。我们知道,一般的登录界面都是一个表单,节选如下:
<form action="login.php?" method="post" name="login" onSubmit="this.submit.disabled = true;">
<input type="hidden" value="" name="forward" />
<input type="hidden" value="http://bbs.qzzn.com/index.php" name="jumpurl" />
<input type="hidden" value="2" name="step" />


<td width=”20%” onclick=”document.login.pwuser.focus();”><input type=”radio” name=”lgt” value=”0″ checked />用户名 <input type=”radio” name=”lgt” value=”1″ />UID</td>
<td><input type=”text” maxLength=”20″ name=”pwuser” size=”40″ tabindex=”1″ /> <a href=”reg1ster.php”>马上注册</a></td>
<td>密 码</td>
<td><input type=”password” maxLength=”20″ name=”pwpwd” size=”40″ tabindex=”2″ /> <a href=”sendpwd.php” target=”_blank”>找回密码</a></td>

...

</form>
从这里可以看出,我们需要输入的用户名密码对应的就是 pwuser 和 pwpwd,而 step 对应的则是登录(这个是尝试出来的)。

注意到,这个论坛表单采用的是 post 方式,如果是 get 方式则本文的方法就需要变动一下,不能直接 open,而是应该首先 Request,然后再 open。更详细的请看手册…

8 本很不错的 Python 电子书(英文)

1) The Byte Of Python

‘A Byte of Python’ 是一本适合 Python 初学者的电子书,该书将告诉你如何存储文本文件。

2) Dive into python

3) Think Python

4) Learn Python the Hardway

LPTHW 强调精确到细节,注意力和持久性,要求你输入每次手工输入代码并运行(没有复制粘贴!)

5) Python Tutorial

6) Python Programming

7) Invent with Python

8 ) Dive Into Python 3

Python 的详细介绍:请点这里

Python 的下载地址:请点这里

我的Python GUI之旅

最近用python帮朋友写一个读写二进制文件的程序,很快就写好了控制台程序。用过之后感觉不方便,因为涉及到数据检索,在控制台下执行这样的操作太痛苦了,于是便有了编写窗口程序的需求。我也因此开始了我的python gui之旅。

  因为用python的时间不长,对其gui编程没有任何了解,说实话一开始就没打算用python写窗口程序,我觉得这不是python的强项。但世界是在变化着的,呵呵,闲话少叙,进入正题。
  经过一番google,首先进入我视野的是pyqt和wxPython,pyqt是基于目前比较成熟的商业套件Qt的,并且有比较好的开发环境Eric(正是这一点吸引了我)。于是下载qt、pyqt、Eric,好麻烦哦。总算下完了,执行安装吧,蹦出来一提示:“需要安装g++编译器”。太郁闷了,我不就是想开发一个简单的窗口程序嘛,至于这么麻烦嘛,放弃!
  于是转向wxPython,下载完成后执行安装,很快完成。但是却没有找到启动开发环境的地方,反复琢磨才弄明白,wxPython只是提供gui开发的基础库,并没有开发环境。又经过一番搜索找到了几个基于wxPython的工具:boa、wxGlade、wxWidget。
  首先使用boa,这个工具的界面很像delphi,集成了UI设计和代码编辑,但是好像不太稳定,不定什么时候就Crash了,最要命的还是它的代码Auto-Complete功能使用的快捷键是Ctrl+Space,并且没有地方进行修改。后果可想而知,除非用菜单进行AC,总不至于让我修改使用过了N多年的输入法快捷键吧。放弃!
  目光转向wxGlade和wxWidgit,这哥俩不亏都是姓“wx”的,都是只能用来设计UI,不具备代码编辑功能,因此不能算是IDE,功能好像也都差不多。先装了个wxGlade,在没有文档没有外援的情况下,使用了一下,就一个体会:“控件简直没法定位,没法用!”。于是又装了个wxWidgit,感觉好像跟wxGlade差不多,试用了一下就Uninstall了。
  转了一圈也没有找到个称手的工具,我的心那是哇凉哇凉的!但是程序还得写啊,又一番猛search,发现大家对这个wxGlade的评价还挺好,甚至有人推荐使用。看来是我了解不够,于是又硬着头皮把我已经卸载的wxGlade请回来,仔细了解这个工具的功能,并且做了些尝试,发现用起来确实还挺好,控件的定位只要用好sizer控件,还是挺方便的。但有一个问题,中文支持不太好,如果使用过了中文,再次载入设计好的界面文件时会出错,可能是我了解的还不够深入吧。
  简单介绍一下wxGlade的使用。
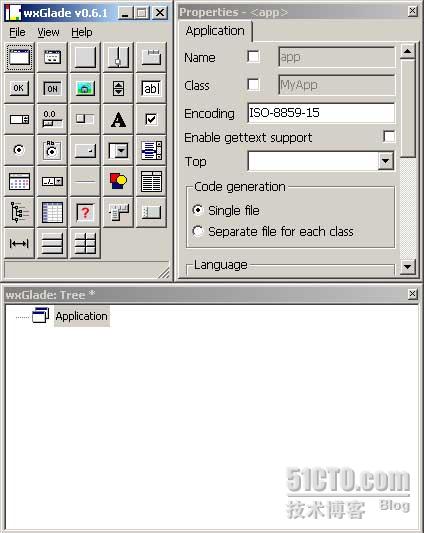
  进入程序后,主界面有三个窗口,如下图所示:
 
  首先点击控件窗口的第一个图标,添加一个Frame,接着就可以向新建的Frame中添加控件了。控件的布局使用sizer进行控制,也就是控件窗口里最后两个控件(即BoxSizer和GridSizer)。
  先考虑好界面的布局的大概的样子,让后向Frame里添加sizer,把布局搭建出来,每个sizer里可以包含多个solt,一个solt里只能放一个控件,当然sizer里的solt是可以随时添加和移除的,sizer里也可以包含子seizer。使用过程中多体会试验就好啦。
  界面搭建好后,设置一下输出路径,使用快捷键Ctrl+G就可以生成py代码了。执行一下,界面是不是出来了呢。
  搭建好的界面可以存成文件,以便进行修改时直接就可以调出来之前的设计。不过修改有一点麻烦,因为在界面搭建好后肯定会增加代码,这个时候重新生成的代码,就需要自己手工抠出来新加入的控件的代码,然后填到程序里。这一点也导致wxGlade只能做一些界面比较简单的程序,如果结构很复杂,在写了很多代码后要修改界面,肯定是很痛苦的事情。
  不过话说回来,我觉得如果要开发商业性的桌面程序,py+wxGlade目前还是不能够胜任的,但如果用来开发一些实用性的小程序,凭着wxGlade的简单和python的强大、灵活还是很有杀伤力的。
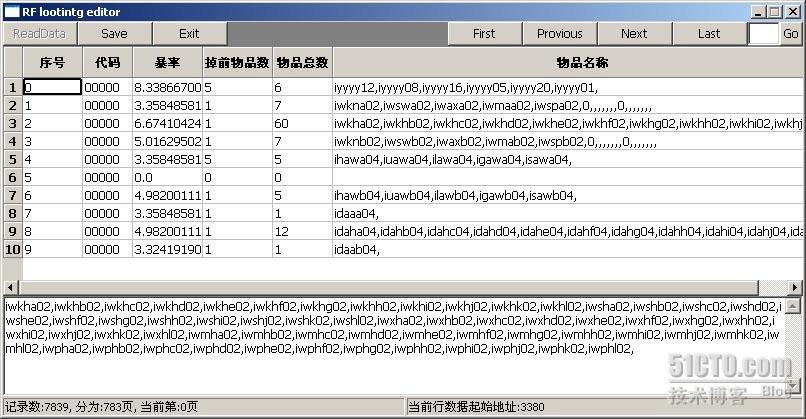
  最后秀一下我写地程序的界面,臭美一下。

本文出自 “江湖” 博客,因为已经被封了,所以就直接转了~